ActCheckTracker is a Windows desktop application that "visualizes" your PC work.
It automatically records and aggregates daily mouse operations and keyboard inputs, visualizing them
with beautiful graphs and charts.
This allows you to objectively review your "work effort" and "concentration patterns" as data, which was
previously only grasped based on feeling.
In the modern era where PC work is central, such as remote work or freelance, grasping your workload and
maintaining motivation are important issues.
ActCheckTracker serves as your partner, quietly watching over your daily activities and recording them
beautifully.
About This Application
ActCheckTracker is created and provided through individual development. In an individual development environment,
we continuously work on improvement and quality enhancement to provide the highest quality software possible.
Feedback from users is very helpful for improving the application.
Video 1.1 Application Demo
Key Features
Beautiful Visualization: Displays data intuitively and attractively using rich
graphs, heatmaps, radar charts, etc.
Privacy-First Design: Keyboard input records only statistical information such as
"which key was pressed how many times", and does absolutely NOT record the content of
entered text (passwords, sentences, etc.). You can use it with peace of mind.
Real-time Dashboard: You can check your current activity status (activity score,
input speed, work efficiency, etc.) in real time.
Detailed Statistical Analysis: Analyze data over various periods such as today,
yesterday, this week, and this month to understand work habit trends.
Personalized Work Environment: Freely arrange 19 types of dashboard components and
choose from 15 color themes to suit your preference.
1.2 Key Features
Activity Monitoring
Keyboard keystroke count, aggregation by type (alphanumeric, function keys, etc.)
Mouse click count, movement distance, movement speed
Detailed activity pattern recording in 1-minute units
Recording application usage status (by process name)
Real-time Dashboard
Real-time display of current work efficiency and concentration
19 types of rich widgets (graphs, gauges, heatmaps, etc.)
Free layout change by drag and drop
Two aggregation modes: "From Launch" and "From Today 0:00"
App usage ranking display
Statistical Analysis Report
Various period reports such as today, yesterday, day before yesterday, this week, last week,
past 7 days, this month, last month, all time
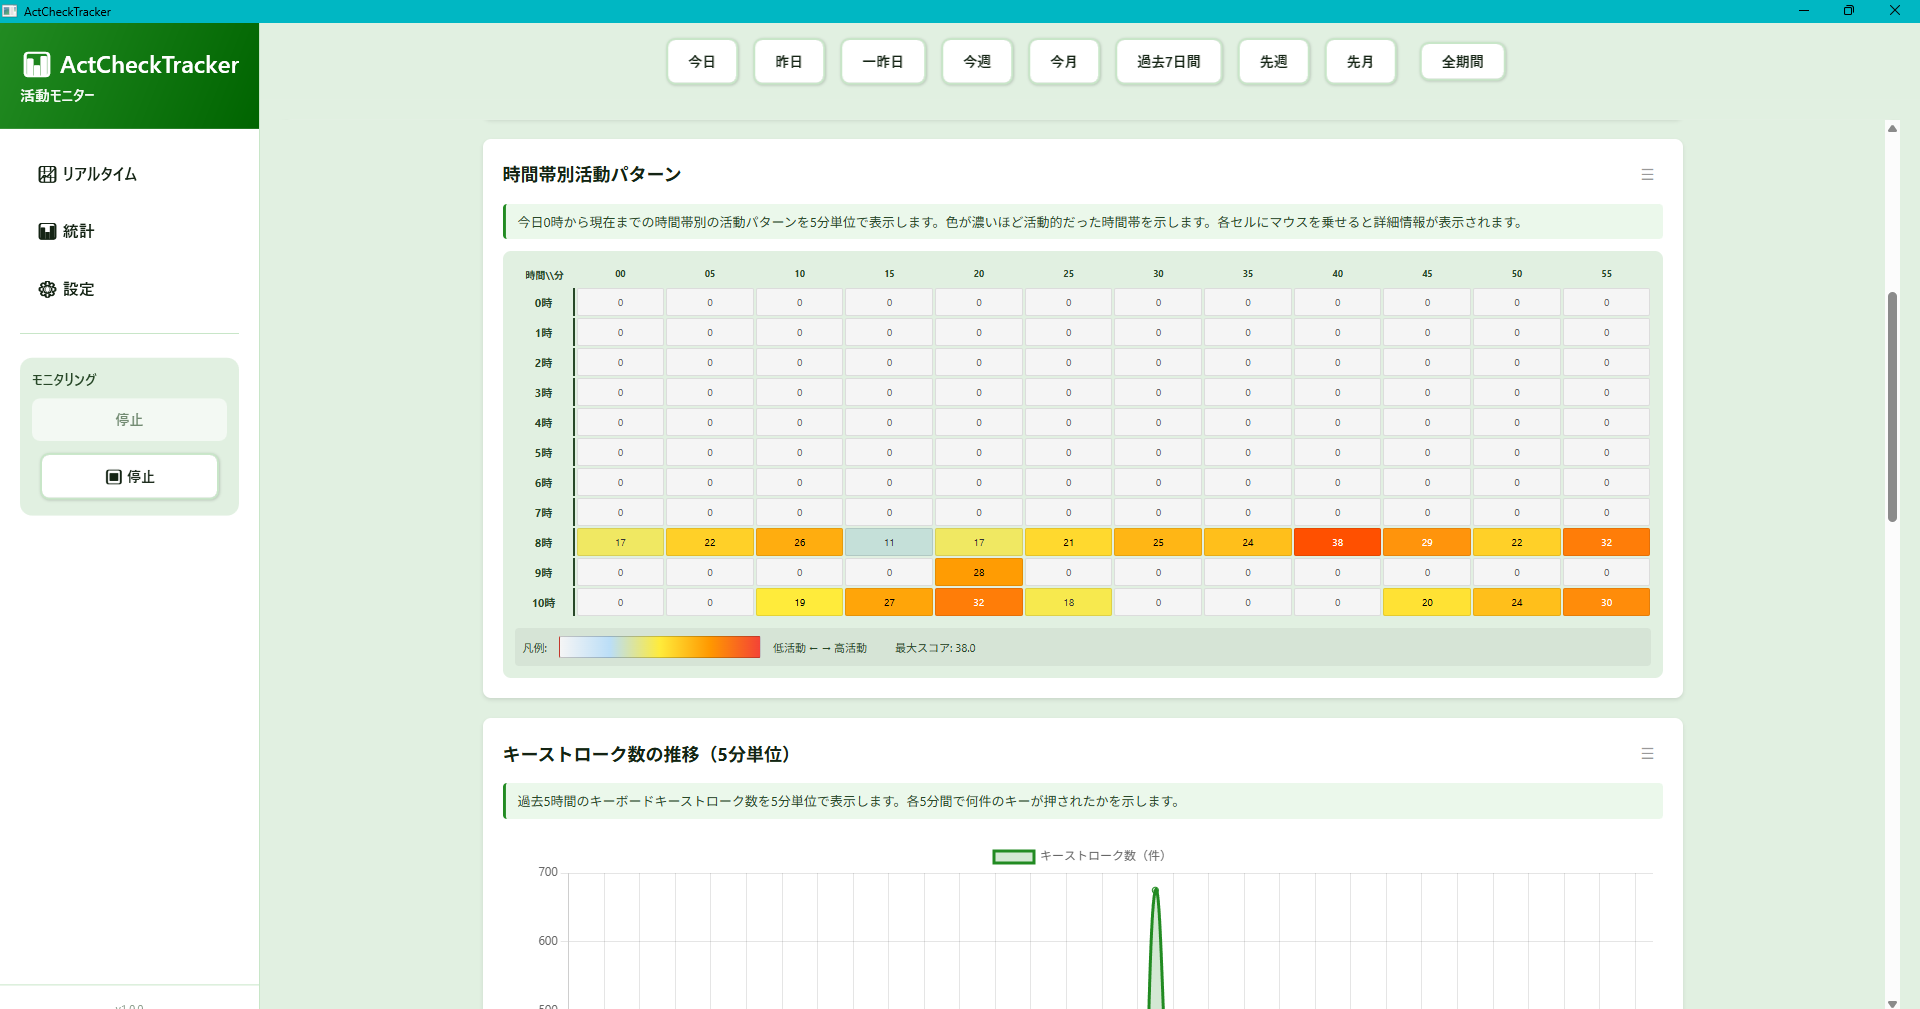
Heatmap showing activity trends by time of day
Comparative analysis with past data
App-specific usage time chart
Focus Session Feature (Stopwatch)
Record and analyze only the sections intended by the user
Browse and manage session history
Display session details (Future: PDF output planned)
Status Notification Feature (Smart Notification)
Notify milestones of effort and breaks via Windows notifications, such as "10,000 keystrokes
achieved" or "1 hour continuous operation"
Easy setting with "Notification Presets" tailored to your purpose (Health focus,
Productivity focus, etc.)
Notifications are completed locally, ensuring privacy
Data Management and Privacy
Complete data ownership via local storage
Configurable automatic data deletion function
Backup (Export) and Restore (Import) in JSON format
1.3 System Requirements
To use ActCheckTracker comfortably, the following environment is recommended.
OS
Windows 10 (Version 1809 or later) / Windows 11
Architecture
x64 (64-bit)
Required Runtime
No additional installation required (Bundled with the app in Microsoft
Store version)
Display Resolution
Recommended: 1400x900 or higher (Minimum: 800x600)
Others
WebView2 Fixed Version Runtime bundled (Statistical charts can be
displayed offline)
2. Installation and Launch
2.1 How to Install
ActCheckTracker can be safely and easily installed from the Microsoft Store.
Open "Microsoft Store" from the Windows taskbar or Start menu.
Type "ActCheckTracker" in the search bar and search.
Click the "Get" or "Install" button on the app page. Download and installation will complete
automatically.
Hint: By using the Microsoft Store version, the latest features and security fixes are
automatically applied.
2.2 First Launch and Auto Maintenance
After installation, select "ActCheckTracker" from the app list in the Start menu to launch it.
On the first launch, the storage area for activity data will be automatically prepared.
[First Time Only] About Consent (Privacy):
On the first launch, a consent screen will be displayed before starting input monitoring (low-level
hook).
Monitoring starts only if you agree. If you refuse, the app will exit.
From the second launch onwards, the consent status is saved, and monitoring starts automatically (you
can Stop/Start from the monitoring panel on the left).
About Data Safety:
ActCheckTracker automatically runs a "Data Integrity Check" in the background every time it starts.
Even if there is an inconsistency in the data file due to an unexpected PC shutdown, etc.,
this function automatically detects the problem and repairs it as much as possible. You can always start
using it safely without being aware of it.
2.3 Exiting the Application
Click the "×" button at the top right of the window, or right-click the icon in the taskbar and select
"Close window".
During the app exit process, the window may remain for a few seconds until the latest activity data in
memory is securely saved.
This is an important process to prevent data loss, so please wait without forcing it to close.
3. Quick Start
3.1 First Steps
Let's experience how ActCheckTracker works.
Launch the app and agree (first time only) following the instructions on the consent screen.
Confirm that the main screen (Real-time Dashboard) is displayed.
In that state, try typing on the keyboard or moving the mouse.
You can confirm that the "Activity Score", "Input Speed Gauge", "Activity Ring", etc. on the
dashboard move in real time according to your operation.
Preparation is complete! ActCheckTracker has already started recording your "effort".
Minimize the window and perform your PC work as usual so as not to get in the way.
Video 3.1 Quick Start Guide
3.2 Basic Usage Flow
Here is an example of a daily usage cycle.
☀️ Morning: Start Work
Launch ActCheckTracker when you turn on your PC (It is convenient to turn on "Run at startup").
Minimize the window.
💻 Noon: Working
Open the window when your concentration breaks or at a good stopping point. Check your current
concentration and work pace on the "Real-time" screen to boost motivation.
🌙 Night: End Work
Open the "Statistics" tab before finishing work. Check the "Today" report and look back on total
activity time and peak times. End the day realizing "I worked this hard today".
4. Basic Operations
4.1 Screen Layout
The screen of ActCheckTracker has a simple and intuitive "2-pane (left and right split) configuration".
Sidebar (Left side):
An operation panel for switching screens and starting/stopping monitoring (recording). It is always displayed.
Main Area (Right side):
The area where details of the selected function (Real-time dashboard, statistics graph, settings screen, etc.) are displayed.
Figure 4.1 Screen Layout
4.2 Start and Stop Monitoring
To start or stop recording your activity data, use the "Monitoring" panel at the bottom of the sidebar.
Start Recording:
Click the Start button.
* When the app starts, recording starts automatically by default (the "Start" button is already pressed).
Stop Recording:
Click the ⏹ Stop button.
Recording stops and data is saved to your computer.
Figure 4.4 Monitoring Operation
Hint: If you turn on "Run at startup" in the settings screen, recording starts in the background as soon as the PC starts, preventing you from forgetting to press it.
4.3 Switching Screens
You can switch the display of the main area by clicking the menu button on the sidebar.
📈 Real-time: Displays the current activity status (current minute or cumulative today) in real-time animation.
📊 Statistics: You can look back on past data in detail with graphs (daily, weekly, etc.).
⏱️ Focus Session: Use the stopwatch function to record and analyze activities in the intended section.
📋 Session History: Browse and manage the history of past focus sessions.
⚙️ Settings: Change app settings and manage data backup/deletion.
4.4 Focus Session Feature
The Focus Session function is a stopwatch function that cuts out and records/analyzes only the section intended by the user, separately from the main continuous recording.
Figure 4.2 Focus Session Start
Figure 4.3 Session Measuring
Start Session:
Enter a title on the focus session screen and click the start button.
* Can only be started if main monitoring is enabled.
Stop Session:
Clicking the stop button ends the session and saves the data.
View Session History:
You can list and check details of past focus sessions on the session history screen.
Figure 4.5 Session History
Hint: Focus sessions are automatically stopped when main monitoring stops. You need to keep main monitoring enabled.
4.5 Status Notification Feature (Smart Notification)
This function supports you by displaying Windows toast notifications (notifications at the bottom right of the screen) according to your work status.
Useful for "Visualization of Effort" and "Prevention of Overuse (Health Management)".
Achievement Notification: Increases motivation by notifying daily accumulations such as "10,000 keystrokes achieved!" and "Mouse movement distance reached 1km!".
Health/Break Notification: Functions as a reminder to encourage moderate breaks, such as "You have been working continuously for 1 hour" and "Too many clicks".
About Settings:
You can customize notification conditions and frequency in detail from "Settings" > "Notification Settings" in the side menu.
A "Preset (Recommended Set)" function that does not require troublesome settings is also available.
5. Real-time Dashboard
5.1 What is the Dashboard?
The "Real-time Dashboard" is the main screen that visualizes your current PC operation amount (keystroke count, mouse movement distance, click count, etc.).
Data is updated every second, and you can intuitively grasp the current work load and concentration (activity score) with animation.
Figure 5.1 Real-time Dashboard Example
5.2 Switching Aggregation Modes
The "Aggregation Period" of the numbers displayed on the dashboard can be selected from two modes according to the purpose.
Switching is done on the settings screen (Sidebar "Settings" > "Display Settings").
Figure 5.2 Aggregation Mode Settings
From App Launch (PerLaunchMode):
Displays data from when the app was launched this time until now.
Since it resets when the PC is restarted, it is ideal when you want to measure "current work session" or separate "morning/afternoon work".
From Today 0:00 (DailyMode):
Displays the total value from 0:00 am today to the present.
Since the value is maintained even if the app is restarted, it is convenient when you want to grasp the daily total amount such as "how much I typed in one day today".
5.3 Customizing Layout
You can freely rearrange the panels (components) of the dashboard to your liking.
Reorder (Drag & Drop):
You can change the order simply by dragging the panel with the mouse and moving it to the desired location.
Show/Hide (Right-click menu):
"Right-click" on the background of the dashboard (or on the panel) to display the component list menu.
Simply turn the checkbox on/off to customize it into a simple screen displaying only necessary information.
Video 5.1 Customizing Layout (Right-click operation)
5.4 Dashboard Components
The following components (information panels) are available. Switch display/hide according to your usage.
5.4.1 Basic Info/Summary
Session Info (SessionInfo):
Displays the elapsed time since measurement started, and the breakdown of active time (time actually operating) and idle time (time left alone).
Statistics Summary (RealtimeStatsSummary):
Displays "Total Keystrokes" and "Mouse Movement Distance" for the day in a compact manner.
Basic Statistics (BasicStatistics):
Displays the four major indicators of keystroke count, click count, movement distance, and active time in large card format.
Detailed Statistics (DetailedStatistics):
You can check detailed numerical data (such as average input count per minute) more than basic statistics.
5.4.2 Charts/Graphs (Time Series/Transition)
Real-time Chart (RealTimeChart):
Displays changes in input intensity over the last few minutes as a line graph. Ideal for checking waves of concentration.
Activity Metrics (ActivityMetrics):
Indicates current activity level as "High/Low" compared to past averages.
5.4.3 Activity Analysis/Score
Activity Score (ActivityScore):
ActCheckTracker's unique indicator. Calculates "current concentration" as a score of 0 to 100 from the frequency of key input and mouse operation.
Activity Radar Chart (ActivityRadarChart):
Visualizes the balance of "Key Input", "Mouse Operation", "Activity Time", etc. with a polygonal graph.
Pulse Activity Ring (PulseActivityRing):
Intuitively expresses current activity intensity with ring-shaped animation.
Activity Heatmap (ActivityHeatmap):
Expresses the shading of activity volume by time of day with color density, allowing you to grasp at a glance when you were concentrating.
5.4.4 Key/Mouse Detailed Analysis
Key Category Breakdown (KeyCategoryBreakdown):
Displays what kind of keys (character keys, function keys, cursor keys, etc.) are used frequently.
Key Category Donut Chart (KeyCategoryDonutChart):
Displays the ratio of key input as a pie chart.
Click Breakdown (ClickBreakdown):
Displays the counts of Left Click, Right Click, and Middle Click respectively.
Click Breakdown Donut Chart (ClickBreakdownDonutChart):
Displays the ratio of click operations as a pie chart.
Click Ratio Chart (ClickRatioChart):
Displays the weight of click operations relative to total operations.
5.4.5 Efficiency/Speed Gauge
Real-time Input Speed Gauge (InputSpeedGauge):
Displays current typing speed (keys/sec) in meter format.
Work Efficiency Gauge (WorkEfficiencyGauge):
Estimates and displays current work efficiency from the balance of break time and work time.
Mouse Speed Gauge (MouseSpeedGauge):
Displays mouse cursor movement speed and distance in meter format.
Activity Time Ratio Chart (ActivityTimeRatioChart):
Displays the percentage of time actually operating (utilization rate) out of app running time.
5.4.6 App Usage Status
App Usage Ranking (AppUsageRankingComponent):
Displays usage time, keystroke count, and click count by application in ranking format.
Can be sorted by three criteria: Usage Time, Keystrokes, and Clicks.
5.4.7 Input Balance Panel
Input Balance Panel (InputBalancePanel):
Displays the balance of three input methods (keyboard, mouse, scroll) in a futuristic holographic-style visual chart.
Each input method is displayed as an independent circular progress ring, visualizing the percentage relative to the total of the three elements in real-time.
Light particles rotate around each ring, and animations are executed when data is updated.
Keyboard is displayed in cyan/blue tones, mouse in magenta/pink tones, and scroll in lime/green tones.
Scroll Speed Gauge (ScrollSpeedGauge):
An analog meter-style component that displays vertical scroll speed in real-time.
Two meters are displayed side by side, visualizing both events per second and distance per second.
The speed is calculated by dividing the difference between the previous and current values by the elapsed time (1-second intervals), displaying real-time speed.
Even when scrolling back and forth, it correctly calculates as an absolute value, accurately reflecting the total scroll amount.
When input stops, it quickly returns to 0 through decay processing, accurately displaying the current activity status.
The events/second meter is displayed in cyan tones (#00BFFF), and the distance/second meter is displayed in lime green tones (#00FF7F).
6. Statistics Screen
6.1 What is the Statistics Screen?
While the "Real-time Screen" is for instantly grasping the current situation, the "Statistics Screen" is a screen for looking back on past data and analyzing long-term trends and habits.
Accumulated log data is aggregated and visualized as graphs from various perspectives (by time of day, daily transition, key input ratio, etc.).
Figure 6.1 Statistics Screen Example
6.2 Selecting Periods
By clicking the buttons lined up at the top of the screen, you can switch the aggregation period.
Short-term Analysis: "Today", "Yesterday", "Day before Yesterday"
All Time Peak Hours (peakHourChart): Time zone most active throughout all time
App Usage Time (appUsageTime): Application usage status by month or week
Scroll Amount by Direction (scrollEvents): Trend of scroll amount (sum of absolute \u0394) split by direction
Figure 6.5 All Time Statistics Data Example
6.4 Customizing Chart Layout
Charts on the statistics screen can be rearranged and visibility settings changed according to user preference.
Reorder: Drag and drop the "☰ (Hamburger menu)" icon at the top right of each chart to intuitively change the display order of charts. Changes are automatically saved.
Toggle Show/Hide: From the "Statistics Page Settings" section of the settings screen (sidebar "Settings"), you can hide unnecessary charts or return to the default order.
Video 6.1 Reordering Charts (Drag & Drop)
7. Focus Session Feature
7.1 What is a Focus Session?
The Focus Session function is a stopwatch function that cuts out and records/analyzes only the section intended by the user, separately from the main continuous recording.
You can measure the time you are concentrating on a specific work or project and analyze activity data for that period in detail.
Focus sessions can only be started when main monitoring is valid. If main monitoring stops, the focus session also stops automatically.
7.2 Starting and Stopping Sessions
Click the "⏱️ Focus Session" button on the sidebar to open the Focus Session screen.
Enter Title: Enter the title of the session (e.g., "Project A Work", "Morning Focus Time", etc.).
Click Start Button: The session starts and the stopwatch begins to move.
Work: Perform PC work as usual. Activity data during the session is recorded.
Click Stop Button: Ends the session. A confirmation dialog appears, so confirm and stop.
During session execution, elapsed time and statistical information (keystroke count, click count, app usage status, etc.) are displayed in real time.
Click the "📋 Session History" button on the sidebar to view the history of past focus sessions.
Specify Period: You can display sessions for a specific period by specifying the start and end dates.
Session List: Title, start time, end time, elapsed time, and statistical information of each session are listed.
Session Details: Select a session to check detailed statistical information.
PDF Output: Click the "PDF Output" button on the session history screen to output a detailed statistical report of the selected session in PDF format. The report includes detailed statistics such as basic session information, keystroke count, click count, mouse movement distance, and app usage status.
Figure 7.3 Session History List Screen
Figure 7.4 Session History Detail Screen (Chart View)
Figure 7.5 Focus Session PDF Output Report (Browser View)
7.4 Deleting Sessions
You can delete sessions that are no longer needed on the session history screen.
Select the session you want to delete.
Click the "Delete" button.
Confirm the dialog and execute deletion.
Note: Session deletion cannot be undone. We recommend exporting and backing up data if necessary before deleting.
8. Settings
Clicking the "Settings" button on the sidebar menu allows you to configure detailed application settings. The settings screen is divided into the following categories.
Figure 8.1 Settings Screen Example
8.1 Privacy Settings
Data Collection Status:
Displays the current monitoring status (monitoring/stopped). This is a display-only indicator of the actual monitoring state (`MonitoringService.IsMonitoring`) and is not a toggle function. To start/stop monitoring, use the monitoring panel on the left side. The display is automatically updated when the monitoring state changes.
Data Not Recorded:
For privacy protection, it is clearly stated that key input content and screen captures are absolutely not recorded.
8.2 Data Export/Import
Perform data backup and migration. There are two types of export/import methods.
8.2.1 Session Data Export/Import
Export/import session data only by specifying a period.
Export Period:
You can output data by "All Time" or "Specify Date".
Export Data (📤):
Saves session data for the specified period in JSON or CSV format.
Import Data (📥):
Restores (merges/integrates) session data from a previously saved JSON file.
Figure 8.2 Data Export/Import Screen (v1.0.3+)
8.2.2 Entire Folder Export/Import
[Added in v1.0.3+] Export/import the entire Data folder as a ZIP file. Includes all data such as sessions, focus sessions, notification settings, and notification history.
When to use:
Use this when you want to move/backup everything (including settings and history). If you only need activity sessions for a certain period, use Session Data Export/Import instead.
Privacy note:
The ZIP contains export-info.json, which may include UserName and MachineName for troubleshooting. Do not share it with untrusted parties.
📦 Export Entire Folder:
Exports the entire Data folder as a ZIP file. Includes metadata such as export date, app version, and license status.
📥 Import Entire Folder:
Imports the entire Data folder from a ZIP file. A preview is displayed before import, and you can select the import mode.
Recommended: If you want to keep data before uninstalling, use the "Export Entire Folder" feature. This allows you to backup all data as a single ZIP file.
8.3 Data Management
Delete unnecessary data.
Data Retention Period (Days):
Automatically deletes data older than the specified number of days. 0 or less is disabled (default is 0), so it is not automatically deleted initially. Set days as needed. Deletion judgment is basically based on session start date/time (best effort judgment by file date/time if data is corrupted and unreadable).
Delete by Period (🗑️):
Delete data for a specific period with quick selection like "Today", "Yesterday" or date specification.
Delete All Data (🗑️):
Completely erase and reset all history data.
Figure 8.3 Data Management Screen
8.4 Startup Settings
Run at Application Startup:
A setting to automatically launch the app in the background when the PC starts (Recommended).
When this setting is turned ON, the application's executable path is registered in the Windows Registry (`HKEY_CURRENT_USER\SOFTWARE\Microsoft\Windows\CurrentVersion\Run`). This also works with MSIX packaged versions (requires `runFullTrust` capability).
Registration Check Button:
Clicking the "Check Registration" button displays the following information:
Registration status (enabled/disabled)
Registered path in the registry
Current executable file path
Path match/mismatch
File existence check result for the registered path
This information allows you to verify that the startup registration is correctly configured.
Single Instance Specification:
Only one instance of the application can run at a time. If an existing instance is already running, attempting to launch a new instance will bring the existing instance's window to the foreground, and the new instance will exit (uses Mutex).
Keep the app running in the background (System Tray):
When enabled, closing the window (× button) will not exit the app. Instead, the app will be minimized to the system tray and continue monitoring in the background. You can open/exit the app from the tray icon context menu or by double-clicking the tray icon.
Tray Icon Context Menu:
Right-click the tray icon to display the menu with "Open" and "Exit" options.
Double-click to Open:
Double-click the tray icon to restore the window.
Balloon Tip:
When minimized to the tray for the first time, a notification balloon will appear to inform you that the app is running in the background.
8.5 Display Settings
Theme Selection:
Change the overall design (color scheme) of the app.
Update Interval (sec):
Adjust dashboard update frequency between 1 to 60 seconds.
Real-time Dashboard Settings:
Select aggregation period mode and change the basis of numbers displayed on the dashboard.
From App Launch (PerLaunchMode):
Aggregates only data from when the app was launched this time until now. Numbers reset upon restart. (e.g., suitable for measuring per work session like "how much I type in work from now")
From Today 0:00 (DailyMode):
Total data from 0:00 am today to present. Numbers are maintained even if app restarts. (e.g., suitable for grasping daily activity amount like "how much I used PC in total today")
Dashboard Component Visibility:
Toggle ON/OFF of each information panel displayed on the home screen (Real-time Dashboard). 💡 Hint:
You can also quickly call up the display item setting menu by right-clicking on the dashboard screen, not just from the settings screen.
Figure 8.4 Display Settings Screen
8.6 Statistics Page Settings
Reset Chart Layout:
Return the display/hide and order of each chart on the statistics screen to the default (at app installation) state. Reset buttons are available for each period like "Today", "This Week".
8.7 Application Information
You can check the current version and the path (location) of the folder where data is actually saved.
8.8 License Information (Trial Version)
If you are using the trial version of ActCheckTracker, you can check your license status and purchase a license from the "License Information" section in Settings.
Figure 8.6 License Information Section (Trial Period Active - 6 Days Remaining)
In the "License Information" section, you can see:
License Status: Displays "Trial Version" during the trial period
Trial Period Information: Shows remaining trial days (e.g., "Trial period active (6 days remaining)")
Purchase Button: A "Purchase" button is displayed during the trial period (both active and expired). Clicking this button opens the Microsoft Store purchase page.
Checking License Status
To check your license status:
Open the Settings screen from the sidebar menu (⚙️ Settings).
Scroll down to the "License Information" section.
Check the "License Status" and "License Details" displayed in this section.
The license information is automatically updated when you open the Settings screen. The following information is displayed:
License Status:
Displays your current license status:
Trial Version: You are currently in the trial period.
Purchased: You have purchased a license.
Trial Expired: The trial period has ended.
License Details:
Displays detailed information about your license:
If in trial period: Shows remaining trial days (e.g., "Trial period active (5 days remaining)").
If purchased: Shows "All features are available."
If expired: Shows "Trial period has ended. To continue using the app, please purchase a license."
Automatic License Status Update:
The license information is automatically refreshed each time you open the Settings screen. This ensures you always see the latest license status, including updates after purchasing a license or when the trial period expires.
Purchasing a License During Trial Period
You can purchase a license from within the app during the trial period:
Open the Settings screen from the sidebar menu (⚙️ Settings).
Scroll down to the "License Information" section.
If you are in the trial period (active or expired), a "Purchase" button is displayed in this section.
Click the "Purchase" button.
A confirmation dialog appears. Review the message and click "Yes, continue with purchase" to proceed.
The Microsoft Store purchase page will open. Follow the instructions on the Store page to complete the purchase.
After the purchase is completed, return to the app. The license status will be automatically updated, and all features will become available without restarting the app.
Note:
The "Purchase" button is only displayed during the trial period (both active and expired). Once you have purchased a license, the button will no longer be displayed.
If you purchase a license directly from Microsoft Store (outside the app), the purchase will be detected automatically the next time you launch the app with internet connection.
After purchasing a license, you can verify the purchase status by checking the "License Information" section in Settings. The status should change from "Trial Version" to "Purchased".
About Network Connection During Trial Period
Important: License Authentication Required for Trial Version
While ActCheckTracker is designed as a fully offline application that does not require internet connection for normal operation,
the trial version requires internet connection to Microsoft Store during the trial period to authenticate the license status.
During Trial Period:
The app authenticates the license with Microsoft Store every time it starts to verify trial period expiration and remaining days.
If internet connection is available, the app displays the accurate remaining trial days based on the Store API authentication response.
If internet connection is not available, the app uses the last known license status and trial start date saved locally to estimate remaining days.
After Purchase:
If you purchase a license from within the app, the purchase status is saved locally immediately, and all features become available without restarting the app.
If you purchase a license directly from Microsoft Store (outside the app), the app needs to authenticate with Microsoft Store on the next launch to verify the purchase status.
Important: If you purchase from Microsoft Store and launch the app for the first time after purchase without internet connection, the app will temporarily operate in trial mode. Once you connect to the internet and the app authenticates with Microsoft Store, it will detect the purchase and switch to full version mode.
Once the purchase status is confirmed and saved locally, the app does not require internet connection and operates completely offline.
What Happens When Trial Period Expires
When you launch the app after the trial period has expired (and you have not purchased a license), a dialog box appears prompting you to purchase a license:
Figure 8.7 Trial Period Expired Dialog (When Launching App After Trial Expiration)
The dialog displays:
A message thanking you for using the app during the trial period
Information that the trial period has ended
Instructions to purchase a license if you wish to continue using the app
Two buttons: "Purchase" to proceed with purchase, or "Exit" to close the app
If you click "Purchase", a confirmation dialog appears, and then the Microsoft Store purchase page opens. If you click "Exit", the app closes.
Offline Behavior During Trial Period
If you are offline during the trial period, the app behaves as follows:
First Launch (Offline):
If you launch the app for the first time without internet connection, it will temporarily allow you to use the app as if you have 7 days remaining.
The actual trial period will be verified when you next launch the app with internet connection.
Trial Period Active (Offline):
If you previously launched the app with internet connection and your trial period was confirmed, the app uses the locally saved trial start date to calculate remaining days.
The app continues to work offline based on this calculation.
Trial Period Expired (Offline):
If your trial period has expired (confirmed in a previous online session), the app will not allow you to use it even if you are offline.
Recommendation:
To ensure accurate trial period management, we recommend connecting to the internet at least once during the trial period.
After purchase, you can use the app completely offline without any restrictions.
Trial Version Limitations
The trial version has the following limitations compared to the full version:
Statistics Screen: Only "Today" period is available. Other periods (Yesterday, This Week, etc.) are restricted.
Theme Selection: Only the default theme is available.
Data Export: Data export function is not available.
Data Deletion: Data deletion functions (all data, period-specific) are not available.
Focus Session: Focus Session feature is not available.
Focus Session History: Focus Session history viewing is not available.
Notification Settings: Custom notification conditions cannot be added. Only standard notification presets are available.
Purchase to Unlock All Features:
By purchasing a license, all limitations are removed and all features become available. The purchase is processed through Microsoft Store, and once completed, the app immediately unlocks all features without requiring a restart.
8.9 Notification Settings
Detailed settings for "Smart Notification" behavior.
Customize when to receive notifications according to your work style.
Figure 8.5 Notification Settings Screen
General Settings
Enable Notifications:
Toggle whole function ON/OFF. Turn off if you want to concentrate temporarily.
Max Notifications per Hour:
Set the upper limit of notifications displayed per hour to prevent notifications from becoming too frequent and disturbing work (default is 100). Notifications exceeding the limit are skipped.
Clicking "Add Rule" or "Edit" button of existing rule opens the condition setting dialog.
Here you can define "when to notify" in detail.
① Condition Type (Metric)
There are roughly two types of measurement values for notification criteria: "Cumulative Type" and "Time Type".
Type
Description
Example
Cumulative (Count/Distance)
Notify when "count or amount" exceeds a certain value, such as keystroke count, click count, mouse movement distance.
"Notify if today's key input exceeds 10,000"
"Notify if mouse movement exceeds 1km"
Time (Time/Duration)
Notify when "length of time" meets condition, such as continuous work time or active time. Ideal for break reminders.
"Notify if worked continuously for 2 hours"
(Resets with no operation for 15 minutes or more)
② Time Range (Scope) Setting
Specify "which period" to aggregate for that condition.
Today: Judge by total value from 0:00 today (for daily goal management, etc.).
Current Session (Session): Judge by total value since app launch (or during focus session) (for work break management).
③ Threshold (Target Value)
Enter the specific number for notification.
・Count/Score: Number as is (e.g., 10000)
・Time: Seconds (e.g., 3600 for 1 hour)
・Distance: Pixels (e.g., approx 1,000,000 for 1km)
Hint: Set conditions can be turned ON/OFF anytime. It is recommended to add common rules via "Preset" first and verify, then fine-tune to your own rules as you get used to it.
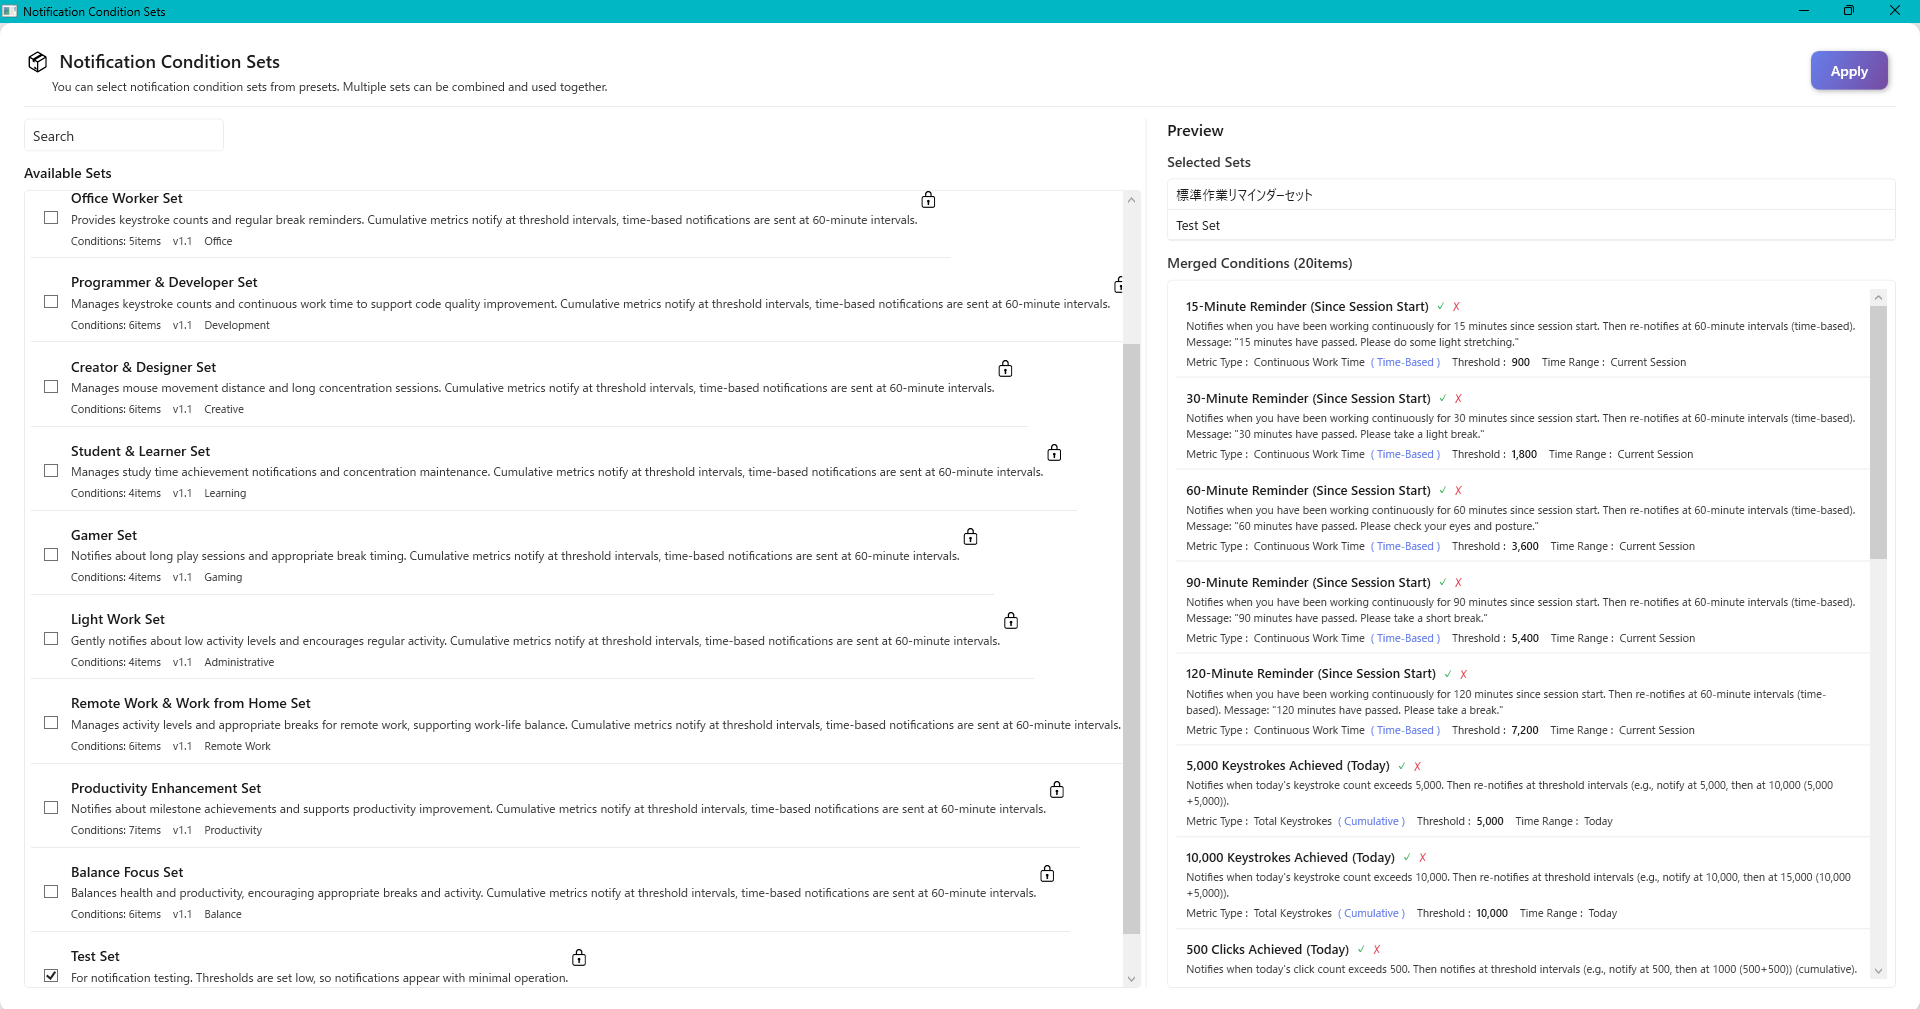
8.10 Notification Presets
If "setting one by one is troublesome", please use the preset function.
You can apply recommended settings tailored to your purpose such as "Health Management" or "Productivity Up" at once.
Figure 8.6 Notification Preset Selection Screen
Select Preset:
Select a preferred set from the list to see the content of conditions included on the right.
Apply Method:
Choose to "Add to current settings (Merge)" or "Clear current settings and replace".
9. Data Management
9.1 Exporting Data (Backup)
You can manually backup activity data or export data in JSON format for migration to another PC.
Click "Settings (Gear icon)" at the top right of the main screen to open the settings screen.
Select "Data Management" from the menu on the left.
From the "Select Period" dropdown in the "Export Data" section, select the period you want to export (All Time, This Year, This Month, etc.).
Click the "Export" button and specify the save destination and file name to save.
Content of Exported File
The output JSON file includes the following detailed information.
Metadata:
ExportDate: Export execution date and time (UTC)
StartDate / EndDate: Target period
SessionCount: Number of sessions included
ExportSource: Information to identify the source of data
UserName: Windows user name (for troubleshooting)
MachineName: PC machine name
DeviceId: Anonymized device ID
Timezone: Timezone information (e.g., Tokyo Standard Time)
AppVersion: App version
Session Data (Sessions):
All activity records within the specified period (detailed data in 1-minute units)
Warning: The export file contains "User Name" and "Machine Name" for integrity checks during data restoration.
Please be careful about handling personal information when passing this file to a third party.
9.2 Importing Data (Restore)
Load a manually backed up JSON file and restore activity data.
The import function is not just a copy. Advanced logic is built in to intelligently handle data duplication and repair corrupted data.
Open "Data Management" in Settings and click the "Select File to Import" button.
When you select the target JSON file, an "Import Preview" is displayed first.
Here you can check the number of sessions in the file, period, duplication status with existing data, etc. in advance.
Select Import Mode and execute.
For session data import, you can choose from the following 5 modes:
Merge (Recommended)
Keeps existing data and adds only new data.
If a session with the same ID already exists, existing data is prioritized and import data is skipped.
Duplicate TimeSlots are automatically consolidated to maintain data integrity.
Overwrite
Prioritizes import data.
If a session with the same ID already exists, existing data is forcibly overwritten with import data.
Used for complete restoration from backup, etc.
Skip
Skips if existing data exists.
If a session with the same ID already exists, that session is not imported.
Use when you only want to add new data.
Merge If Newer
Overwrites only if the import session is newer.
Compares session start times and overwrites existing data only if import data is newer.
Use when you want to prevent overwriting with older data.
Merge If Different
Overwrites only if data differs from existing data.
Compares session content (TimeSlots, statistics, etc.) and overwrites existing data only if different.
Use when you only want to reflect data differences.
Important (Data Safety):
During import, monitoring is temporarily stopped. If monitoring was running, the app finalizes the current session (sets EndTime) and saves buffered data before import.
After import, monitoring restarts with a new session ID to prevent mixing imported data with ongoing data. Imported timestamps are normalized to UTC internally (ISO 8601, Z). In "From App Launch (PerLaunchMode)", dashboard numbers reset after the restart. If you import the same backup multiple times, identical sessions may be automatically skipped to avoid duplication.
Automatic Optimization Process during Import:
During import execution, the app automatically performs the following optimizations in addition to simple data copying.
Consolidate: Cleans up and consolidates small duplicate data of less than 1 minute if any.
Integrity Check: Immediately after import completion, a health check (integrity check) of the entire data runs to check and repair inconsistencies.
Fast and Limited Existence Check: Checks the existence of session files in bulk first, and searches daily files defaulting to date + 3 days before/after only if not found (if no date, searches up to last 180 days, max 365 days for safety). Streaming read buffer expanded to 1MB for stable parsing.
Daily Save Error Stats: Prioritizes session file saving. If daily saving fails, auto-retries (3 times, exponential backoff) and displays count and first few items in result dialog. Recoverable by subsequent integrity check or re-saving.
9.1.2 Entire Folder Export (Backup)
[v1.0.3+] Export the entire Data folder as a ZIP file. Includes all data such as sessions, focus sessions, notification settings, and notification history.
Open the "Data Export/Import" section in Settings.
Click the "📦 Export Entire Folder" button.
Specify the save location and file name (default: ActCheckTracker_Data_Backup_YYYYMMDD_HHMMSS.zip).
Contents of Exported ZIP File
The ZIP file contains the following:
export-info.json: Export information metadata
exportDate: Export execution date/time (UTC)
appVersion: App version (e.g., 1.0.3.0)
baseDirectory: Base directory path of export source
isTrialBuild: Whether it's a trial build
isTrialMode: Whether it's in trial mode
isLicenseValid: Whether the license is valid
deviceId: Anonymized device ID
userName: Windows user name
machineName: PC machine name
timezone: Timezone information
dataStructure: Data structure information (session count, year folders, etc.)
Notifications/: Notification history file (notification-records.json)
.device-id: Device ID file
{year}/: Year folder (e.g., 2025/)
{year}/{month}/: Month folder (e.g., 2025/12/)
{year}/{month}/{yyyy-MM-dd}.json: Daily data files
Note: Folder export does not include layout settings (dashboard-layout.json, chart-layout.json). These are UI display settings and are not necessary for data restoration.
9.2.2 Entire Folder Import (Restore)
[v1.0.3+] Import the entire Data folder from a ZIP file. A preview is displayed before import, and you can select the import mode.
Open the "Data Export/Import" section in Settings.
Click the "📥 Import Entire Folder" button.
When you select a ZIP file, an "Import Preview" is displayed first.
Information such as export date, app version, and session count is displayed.
If the license state differs between export and current, a warning is displayed (data can be imported normally).
If focus session data is included but you are currently in trial mode, a warning is displayed.
Select Import Mode and execute.
For entire folder import, you can choose from the following 3 modes:
Keeps existing data and adds only new data. Session Data: If a session with the same ID already exists, existing data is prioritized and import data is skipped. Only new sessions are added. Focus Sessions: If an existing focus session ID exists, it is skipped. Setting Files: If existing setting files exist, they are skipped. Year Folders: If an existing year folder exists, its contents are merged.
Overwrite
Prioritizes import data. Session Data: If a session with the same ID already exists, existing data is forcibly overwritten with import data. Focus Sessions: If an existing focus session ID exists, it is overwritten. Setting Files: If existing setting files exist, they are overwritten. Year Folders: If an existing year folder exists, its contents are overwritten. Warning: Existing data may be lost, so backup is recommended before use.
Skip
Skips if existing data exists. Session Data: If a session with the same ID already exists, that session is not imported. Focus Sessions: If an existing focus session ID exists, it is skipped. Setting Files: If existing setting files exist, they are skipped. Year Folders: If an existing year folder exists, the entire year folder is skipped.
Use when you only want to add new data.
When import completes, results are displayed.
Number of imported sessions, focus sessions, and year folders are displayed.
If errors occurred, error content and count are displayed.
About Backup and "Restore" (Common to all modes):
Before running an entire folder import, the existing Data folder is automatically backed up to a temporary directory (e.g., %TEMP%\ActCheckTracker_Data_Backup_YYYYMMDD_HHMMSS\).
The backup is kept regardless of success or failure, and after the import result is shown, a "Restore from backup?" confirmation dialog appears.
If you choose not to restore, the imported result is kept (the backup is still kept).
Automatic Processing During Import:
During entire folder import, the following automatic processing is executed:
Data Consolidation: Duplicate TimeSlots are automatically consolidated.
Validation on Save: Data validation (session validation, TimeSlot integrity check) is executed when each session is saved. Additional integrity checks are not performed, but recovery is possible through automatic integrity checks at app startup or manual operations if needed.
Priority Session File Saving: Session file saving is prioritized, and if daily file saving fails, automatic retry (3 times, exponential backoff) is executed.
About License State Differences:
If the license state differs between export and current (e.g., export was in trial mode, current is purchased, or vice versa), data can be imported normally.
Since the data structure is identical between trial and full versions, they are compatible. However, if data for features restricted in trial mode (such as focus sessions) is included, it may not be displayed in trial mode.
9.3 Deleting Data
You can manually delete data that is no longer needed. It is possible to delete only a specific period or reset everything.
Delete by Period:
Select the start date and end date of the period you want to delete in the "Delete Data" section.
Click the "Delete Data for Specified Period" button.
Delete All Data:
Click the "Delete All Data" button.
A confirmation dialog appears, so please execute with caution. This operation cannot be undone.
9.4 Setting Retention Period
You can automatically delete old data to save disk space. Automatic deletion is disabled if 0 or less is specified, and the default value is 0 (initial setting for safe operation).
Select the desired period from the dropdown list in the "Data Retention Period" section (e.g., 3 months, 6 months, 1 year, Indefinite).
When settings are changed, expired old data is automatically deleted in the background at the next startup or when the date changes.
Note: Automatic deletion mainly targets "Activity Data" such as session files and daily data. Deletion judgment is basically based on session start date/time.
9.5 Data Auto-Repair System
ActCheckTracker constantly monitors and maintains data health in the background to protect important activity data from unexpected troubles.
Here is a brief explanation of "when" and "what" this system is doing.
Execution Timing
Checks and repairs are automatically performed at the following three timings.
At App Startup:
First, quickly checks data for the last 1 month.
If an abnormality is found (trace of incorrect termination, etc.), a detailed scan is executed for all past data.
At Data Import:
Checks if data imported from outside is in correct format and consistent with existing data, taking consistency as needed.
At App Exit:
When writing the latest data in memory, it goes through a safe saving process to prevent data corruption even if a write error occurs.
Specific Repair Process
The system always compares "Session File (Detail)" and "Daily File (Aggregate)" and aligns to the correct one if there is a contradiction.
Restoring Missing Files
If "Daily file exists but original session file is missing", restores session info by calculation from daily file.
Conversely, if "Session file exists but daily file is missing", re-aggregates session file to recreate daily file.
Handling Corrupted Data
If a file cannot be read (e.g., JSON deserialization error), it is recorded as an error and the app attempts best-effort recovery from other healthy data (daily data). If recovery succeeds, the session file is re-saved (overwritten).
Note: The current implementation does not “quarantine/move” corrupted files to a separate folder.
9.6 Data Structure (File Structure)
Knowing "where and how my data is stored" leads to peace of mind.
ActCheckTracker saves data in the following structure within your local folder.
Microsoft Store version (MSIX): C:\Users\[UserName]\AppData\Local\Packages\[PackageName]_[RandomString]\LocalState\ActCheckTracker\Data
Record of one work unit from "App Start to End".
Detailed data every 1 minute (keystrokes, mouse movement, etc.) is recorded as is. Role: Serves for detailed analysis and as a backup source.
Daily Data File (yyyy-MM-dd.json)
"Album of the day" summarizing all sessions of that day.
Automatically generated/updated from session files. Role: Used to display graphs of "This Week" or "This Month" quickly on statistics screen.
Focus Session File (focus-session-*.json)
Record of section intended by user (Focus Session).
Saved independently from main continuous recording as separate JSON file per session. Role: Used to analyze time focused on specific work or project in detail.
Privacy Reconfirmation:
Both files are saved in text format (JSON), but
"Content of text typed on keyboard" or "Browsed file name" etc. are essentially NOT included.
Only numerical data such as "Pressed 'a' key X times" or "Moved mouse X pixels" is recorded.
JSON File Structure (For advanced users)
Data files (JSON) are mainly composed of the following three parts.
Metadata
Management info such as data version, creation date/time, device ID (anonymized).
Session Info (Session / Sessions)
Time info from when to when it was running, and body of activity data during that time.
Statistics Data (Statistics)
Keyboard: Total keystrokes, count by key type (character keys, enter key, etc.)
Mouse: Clicks, movement distance, scroll amount
Activity: "Activity Score" calculated uniquely by app and concentration trend
10. Privacy and Security
10.1 Recorded Information
Information recorded by ActCheckTracker is strictly limited to "Quantity" and "Trend" of activity.
Statistical Data:
Keyboard: Total keystrokes, ratio by key category (character keys, enter key, etc.), input speed
Mouse: Clicks, movement distance, scroll amount
Time: Active time, idle time, activity score
Application Name (Process Name): Process name of the application operated (e.g., chrome, notepad, visualstudio, etc.)
System Information (Normal):
Device ID: Anonymous ID hashing (irreversibly converting) PC unique info
App version, Timezone
About App Name Recording:
Application name (Process name) is recorded to grasp which app you worked on.
Only the process name is recorded, window title, file name, URL, application content etc. are NOT recorded at all.
About Data Acquisition Method:
This app uses Windows API (SetWindowsHookEx, GetForegroundWindow, GetWindowThreadProcessId etc.) to monitor keyboard and mouse operations and obtain the process name of the active application.
These APIs are standard functions provided by Windows OS, enabling system-level monitoring. All processing is completed within the user's PC and no external communication is performed.
[Important] Information Included in Backup (Export) Data
JSON files generated by "Data Export" function exceptionally include the following information for data restoration and troubleshooting purposes.
Privacy Warning:
Exported JSON files contain personally identifiable information (plain text) as described above.
Please be very careful not to publish this file on the internet or pass it to untrusted third parties.
10.2 Information NOT Recorded
Information that may infringe on user privacy is technically absolutely NOT acquired/recorded.
❌ Key Input Content: Which characters were typed (passwords, message body, etc.) are not recorded. Only the fact "Character key pressed 1 time" is recorded.
❌ Screen Content: Screenshot, window title, browsing file name, browser URL etc. are absolutely not acquired.
❌ Clipboard: Copied & pasted contents are not recorded.
❌ Camera/Microphone: Absolutely accessed.
10.3 Data Storage Location
All data is saved ONLY in the following local folder on your PC.
Microsoft Store version (MSIX): C:\Users\[UserName]\AppData\Local\Packages\[PackageName]_[RandomString]\LocalState\ActCheckTracker\Data
In both environments, an ActCheckTracker folder is created directly under the base directory, containing Data, Settings, and Logs subdirectories.
ActCheckTracker has absolutely no function to send data to external servers or cloud. Your data exists only inside your PC.
10.4 Data Protection
ActCheckTracker is built with an "Offline-First" design philosophy.
It does not require internet connection (except store update check) and does not open any ports accepting access from outside.
This minimizes the risk of information leakage via network.
10.5 Security Software Conflicts
Because this app uses low-level hooks (Windows API) to monitor keyboard and mouse operations, some security software (Antivirus, Windows Defender, etc.) may display warnings.
About Security Software Warnings:
This app may be falsely detected as keylogger or spyware. This is because it uses technology to monitor keyboard input.
This app does NOT record the content of input characters. Only statistical information such as "number of times keys pressed" is recorded.
This app absolutely does not send data to the outside. All data is saved only in the user's PC.
If security software displays a warning, please check the following countermeasures:
For Windows Defender:
Open "Windows Security" and select "Virus & threat protection".
Click "Manage settings" under "Virus & threat protection settings".
Select "Add or remove exclusions" in "Exclusions" section, and add ActCheckTracker installation folder or executable file to exclusion list.
For Other Security Software:
Add ActCheckTracker to "Trusted Applications" or "Exclusion List" in the settings screen of each security software.
Please verify specific steps in the manual or support page of each security software.
Note: When configuring security software exclusions, please do so after confirming that this app is trustworthy software. Applications obtained from Microsoft Store are safe applications that have passed Microsoft's review.
10.6 System Requirements and Notes
Administrator Privileges: This app runs with normal user privileges. Calculator privileges are not required (However, User Account Control (UAC) confirmation may appear on first launch in some environments).
System Impact: Since this app uses low-level hooks, it may have a slight impact on system performance. In normal usage environments, the impact is hardly felt.
Conflict with Other Apps: Conflicts may occur if used simultaneously with other keyboard/mouse monitoring applications or applications with similar functions.
Games and Full Screen Apps: In some games or full screen applications, low-level hooks may not work properly.
Company/Organization PC: Due to enterprise security (EDR) or management policies, input monitoring (low-level hook) or WebView2 may be restricted, causing warnings, startup failure, or inability to record. In that case, please ask PC administrator for permission.
Virtual Machine Environment: Operation within virtual machine (VMware, VirtualBox, etc.) may be restricted depending on host OS settings.
11. Troubleshooting
11.1 Data Not Recorded/Displayed
Check if App is Running: Check if the app is displayed on the taskbar. If you closed it by mistake, verify launch from start menu.
About Screen Update: Dashboard usually updates automatically in real time. If numbers remain stopped, try switching to another screen like "Statistics" from left menu and return to "Real-time" again.
Restart App: In case of temporary glitch, restarting the app may resolve it. Data repair process also runs automatically at startup.
11.2 Cannot Export/Import
Check Access Privileges: Check if you have write/read privileges for the destination or source folder (Recommend using Desktop or Documents folder).
Check File Format: Check if the file you are trying to import is a correct JSON file exported by ActCheckTracker. Manually edited files may not be readable.
11.3 Security Software Warnings
Because this app uses low-level hooks to monitor keyboard and mouse operations, security software may display warnings.
Meaning of Warning: Security software controls applications that monitor keyboard input as "keylogger" or "spyware". This is a false positive. This app does not record input content, only statistical info.
Countermeasures:
For Windows Defender: Add ActCheckTracker to exclusion list in "Windows Security".
For Other Security Software: Add ActCheckTracker to "Trusted Applications" or "Exclusion List".
Note: Applications obtained from Microsoft Store are safe applications that passed Microsoft review. Please configure exclusion settings after confirming it is trustworthy software.
11.4 App Not Working Properly
Conflict with Other Monitoring Apps: Conflicts may occur if used simultaneously with other keyboard/mouse monitoring applications. Please exit other monitoring apps and restart this app.
Operation in Games/Full Screen Apps: Low-level hooks may not work properly in some games/full screen apps because these apps perform unique input processing.
Virtual Machine Environment: Operation in virtual machine may be restricted depending on host OS settings.
12. FAQ
Q. Can I migrate (transfer) data to a new PC when I buy a new one?
Yes, it is possible.
Perform "Data Export" on the old PC, move the output JSON file to the new PC, then perform "Data Import".
This allows you to continue viewing and managing past activity records on the new PC. If you choose "Add/Update (Merge)" in import mode, existing data on new PC and past data will be integrated cleanly.
Q. Is data backed up to the cloud?
No.
ActCheckTracker is designed with privacy in mind and does not send data to external servers or cloud without permission.
If you need backup, please perform "Data Export" regularly and save the file to USB memory or your own cloud storage (OneDrive/GoogleDrive etc.).
Q. What happens to data if I delete (uninstall) the app?
For MSIX version (Microsoft Store version), all data in the LocalState folder will be deleted when you uninstall the app.
Data that will be deleted when uninstalling:
Microsoft Store version (MSIX):
All data under C:\Users\[UserName]\AppData\Local\Packages\[PackageName]_[RandomString]\LocalState\ActCheckTracker will be deleted
According to Windows specifications, some data files may remain, but basically assume they will be deleted
Important: Before uninstalling, be sure to use the "Data Export" feature to backup important data (available in the full version).
Exported data can be restored later using the "Data Import" feature.
Q. It feels slow/heavy?
If used for a long period and a large amount of data accumulates, aggregation may take time.
Please set "Data Retention Period" from "Settings" > "Data Management" to automatically delete unnecessary old data, or manually delete past data to lighten operation.
12.4 License and Trial Version
Q. Why does the app require internet connection during the trial period?
The trial version requires license authentication with Microsoft Store when the app starts.
ActCheckTracker is designed as a fully offline application, but during the trial period, the app needs to verify your license status with Microsoft Store to confirm the remaining trial days.
Once you purchase a license, the app no longer requires internet connection and operates completely offline.
Q. The app cannot start when I'm offline during the trial period. What should I do?
If you previously launched the app with internet connection, it should work offline.
If you launch the app for the first time without internet connection, it will temporarily allow you to use the app (with a 7-day trial estimate). The actual trial period will be verified when you next launch the app with internet connection.
If you previously confirmed your trial period was active while online, the app uses the locally saved trial start date to calculate remaining days and should work offline.
If your trial period has expired (confirmed in a previous online session), the app will not start even if you are offline.
Recommendation: Connect to the internet at least once during the trial period to ensure accurate license authentication. After purchase, you can use the app completely offline.
Q. I purchased a license, but some features are still restricted. What's wrong?
Try refreshing the license information or restart the app.
After purchasing a license, the app should immediately unlock all features without requiring a restart. However, if features are still restricted, try the following:
Open "Settings" > "License Information" section and wait a moment for the license status to refresh automatically.
If the status still shows "Trial Version", close and restart the app to reload the license status.
If the problem persists, check your Microsoft Store account to confirm the purchase was completed successfully.
If none of these steps resolve the issue, there may be a temporary issue with the Microsoft Store license synchronization. Please try again after some time.
Q. The remaining trial days shown are incorrect. Why?
This may happen if you are offline or if there was a previous error in license authentication.
When offline, the app estimates remaining days based on the locally saved trial start date. This estimate may differ from the actual remaining days if the trial period was not properly authenticated online.
Solution: Connect to the internet and restart the app. The app will authenticate with Microsoft Store and display the accurate remaining trial days.
Q. The "Purchase" button is not displayed. How can I purchase a license?
The "Purchase" button is only displayed during the trial period (active or expired).
If you have already purchased a license, the button will not be displayed because you already have full access to all features.
If you are using the full version (non-trial build), the purchase button is not available because it is not a trial version.
If you are in the trial period but the button is not visible, try refreshing the license information in "Settings" > "License Information" section.
Q. An error occurred during license authentication. What should I do?
Check your internet connection and Microsoft Store status.
License authentication errors can occur due to the following reasons:
No internet connection: The app cannot connect to Microsoft Store. Connect to the internet and try again.
Microsoft Store service issue: Microsoft Store may be temporarily unavailable. Wait a moment and try again.
Network timeout: The authentication request timed out. Check your network connection and try again.
If the error persists, the app will use the last known license status and continue to operate. However, to ensure accurate license status, it is recommended to connect to the internet and restart the app when possible.
Detailed error logs are saved to the following location for troubleshooting:
Microsoft Store version (MSIX): C:\Users\[UserName]\AppData\Local\Packages\[PackageName]_[RandomString]\LocalState\ActCheckTracker\Logs\license_debug.log
Q. My trial period has expired, but the app still works. Is this normal?
This may happen if you are offline and the app has not authenticated the license status recently.
If your trial period expired while you were offline, the app may continue to work temporarily using the last known license status. However, once you connect to the internet and restart the app, it will authenticate with Microsoft Store and detect that the trial period has expired, preventing further use.
Important: To continue using the app after the trial period expires, you must purchase a license. The app will prompt you to purchase when the expired status is detected.
Q. Can I use the app completely offline after purchasing a license?
Yes, but you need to authenticate once first.
If you purchase a license from within the app, the purchase status is saved locally immediately, and you can use the app offline right away.
If you purchase a license directly from Microsoft Store (outside the app), you need to launch the app at least once with internet connection to authenticate the purchase with Microsoft Store. Once authenticated, the purchase status is saved locally, and you can use the app completely offline thereafter.
Important: If you purchase from Microsoft Store and launch the app for the first time after purchase without internet connection, the app will temporarily operate in trial mode. Connect to the internet and restart the app to authenticate and switch to full version mode.
Q. What happens to my license when the app is updated to a new version?
Your license and all settings are preserved during app updates.
When you update ActCheckTracker through Microsoft Store:
All your data and settings stored in the following location are preserved:
Microsoft Store version (MSIX): C:\Users\[UserName]\AppData\Local\Packages\[PackageName]_[RandomString]\LocalState\ActCheckTracker
Your purchase status is automatically saved and preserved locally
The app automatically loads your saved purchase status on startup
If you have purchased a license, it continues to work immediately after the update without requiring re-authentication
You do not need to re-purchase or re-authenticate your license after updating the app.
Q. What happens if I uninstall and reinstall the app? Will I lose my license?
No, your license is managed by Microsoft Store, so it will be restored automatically.
When you uninstall ActCheckTracker, some data files may remain on your PC according to Windows specifications, but they may also be deleted. However, your purchase is managed by Microsoft Store, not by local files.
When you reinstall the app:
The app starts with default settings
On first launch, the app authenticates with Microsoft Store
If you have previously purchased a license, Microsoft Store confirms the purchase status
The app automatically saves the purchase status locally
All features become available immediately
Important: You need to be connected to the internet when reinstalling, so that the app can authenticate your purchase with Microsoft Store. Once authenticated, the purchase status is saved locally, and you can use the app offline again.
Note: While your license is preserved, your activity data (recorded sessions, statistics, etc.) will be lost if you completely uninstall the app, especially for MSIX version where the LocalState folder is deleted. If you want to preserve your data, we strongly recommend exporting your data before uninstalling (available in the full version).
13. Quality
About Development
This application is created and provided through individual development. In an individual development environment,
we implement 630+ test cases and adopt a comprehensive testing strategy, continuously working on improvement
and quality enhancement to provide the highest quality software possible.
13.1 Testing Overview
ActCheckTracker conducts comprehensive testing to provide high-quality software.
Various types of tests are continuously conducted to improve application reliability and stability.
Currently, we have implemented 630+ test cases in 47 test files,
conducting automated unit tests, integration tests, UI tests, and operation verification in actual usage environments.
This ensures verification not only of theoretical operation but also in an environment close to actual user experience.
Tests are implemented using xUnit test framework and continuously executed/updated.
Every time new features are added or fixed, related tests are also added/updated, striving to maintain quality.
Continuous Commitment to Quality
ActCheckTracker adopts a comprehensive testing strategy to provide high-quality software.
We have implemented 630+ test cases, combining automated testing with operation verification in actual usage environments
to deliver a reliable application. When adding new features or improvements, we conduct thorough operation verification
and continuously work on quality improvement.
13.2 Types of Tests Conducted
Unit Tests
Each function's minimum unit (class, method) is tested individually. Covers the following areas:
StatisticsPageUiTests: Statistics screen display and operation
NavigationUiTests: Navigation function
MonitoringControlUiTests: Monitoring control function
StatisticsContextMenuUiTests: Context menu operation
All UI tests are efficiently executed using the same application instance.
Manual Testing
Manual operation verification is also conducted in actual usage environments.
Assuming various usage patterns and edge cases, we verify operation by actually operating the application.
This allows verification in environments close to actual user experience by considering diverse scenarios.
13.3 Test Results
Current test implementation status is as follows (Measured: December 18, 2025):
Number of Test Files: 47+
Total Test Cases: 637 (Executed: 633, Skipped: 4)
Test Success Rate: 100% (All 633 tests passed, Failed: 0)
Code Coverage (Measured: December 18, 2025):
Overall Coverage:
Line Coverage: 13.9% (6453 of 46433)
Branch Coverage: 12.1% (1434 of 11882)
Coverage by Layer:
Core Layer: 95.8%
Application Layer: 55.9%
Infrastructure Layer: 38.2%
Presentation Layer: 2.4%
Tests focused on major functional areas (business logic, data process, statistics calculation)
Tests are continuously conducted, and related tests are updated/added every time new features are added or fixed.
Test execution is automated, running automatically with every code change to maintain quality.
About Coverage (Measured: December 18, 2025)
Since coverage report includes Presentation layer containing many UI codes,
overall coverage is displayed low at 13.9%. However, business logic layers (Core, Application, Infrastructure layers)
which directly affect application reliability achieve high coverage.
Coverage Details by Layer Core Layer (95.8%): Entities, Value Objects, Domain Services etc.,
core business logic achieves very high coverage. Almost all code is tested. Application Layer (55.9%): Use cases, Services, DTOs etc.,
major functions of application layer are sufficiently tested. Improved compared to before. Infrastructure Layer (38.2%): Data repositories, serializers etc.,
major functions are tested. Presentation Layer (2.4%): UI layer coverage is very low.
This is because it contains many codes difficult to test such as WPF XAML code-behind, auto-generated code, UI event handlers.
Important business logic and data processing parts are sufficiently tested,
especially achieving very high coverage of 95.8% in Core Layer.
Important parts affecting application reliability are appropriately covered.
13.4 About Quality
Commitment to Quality
ActCheckTracker aims to provide software of the highest possible quality.
We work on quality improvement through various methods such as conducting comprehensive tests and verifying operation in actual usage environments.
Execution of Operation Verification
We conduct thorough operation verification by assuming various usage scenarios and verifying operation through actual application testing.
This allows verification not only of theoretical operation but also in environments close to actual user experience.
When adding features, we release after conducting sufficient operation verification.
Continuous Quality Improvement
Guaranteeing 100% software integrity is technically and realistically difficult.
Pre-verifying all potentially infinite usage patterns and operations in various environments has limitations regardless of development team size.
However, ActCheckTracker implements 630+ test cases and achieves high coverage in major functional areas,
conducting as many tests as possible and continuously working on quality improvement.
Continuous Improvement
Testing is not a one-time thing but a continuous process.
Tests are continuously updated/extended based on new features, bug fixes, user feedback.
We continue to analyze test results and seek more effective testing methods.
To Users
If you discover bugs or unexpected behavior, please feel free to let us know.
Feedback from users is very helpful for improving application quality.
We want to create better software together with you.
14. License and Credits
ActCheckTracker is supported by many excellent open source software.
We deeply thank the developers and communities of these projects.
Main Libraries/Software Used
This software includes or uses the following open source software.
date-fns - https://date-fns.org/
(MIT License)
Date processing utility (Included in adapter bundle).
Bundled Component
Microsoft Edge WebView2 Fixed Version Runtime (v143.0.3650.80, x64) - https://developer.microsoft.com/microsoft-edge/webview2/ (Microsoft Software
License Terms)
Bundles fixed version runtime to stably operate web display such as statistics screen.
Development & Testing Tools (Not included in production build)
The following libraries are used for development and testing purposes only, and are not included in the production application build.
This application is distributed as a standalone (Self-Contained) application. All direct and transitive dependencies are included in the final output.
For complete license information including full license texts, please refer to the libraries_and_licenses.txt file included with the application distribution.
Please refer to the links above for license details of each library. All libraries used in this application are licensed under permissive open source licenses (MIT, Apache 2.0, BSD-3-Clause) that allow commercial use.